Introduction
Welcome to the guide on how to install PhoenixNAP BMC Ansible Module. PhoenixNAP is a cloud-based infrastructure provider that offers a wide range of services, including managed hosting, cloud hosting, and colocation. The PhoenixNAP BMC Ansible Module is a powerful tool that allows you to automate the deployment and management of your PhoenixNAP infrastructure. In this guide, we will walk you through the steps of installing the PhoenixNAP BMC Ansible Module and setting it up for use. We will also provide some tips and tricks to help you get the most out of the module. So let’s get started!
How to Install phoenixNAP BMC Ansible Module
1. Download the PhoenixNAP BMC Ansible Module from the official website.
2. Extract the downloaded file and copy the contents to the Ansible library directory.
3. Create a playbook to install the PhoenixNAP BMC Ansible Module.
4. Run the playbook to install the PhoenixNAP BMC Ansible Module.
5. Verify the installation by running the command “ansible-playbook –list-tasks”.
6. Test the installation by running the command “ansible-playbook –list-hosts”.
7. Configure the PhoenixNAP BMC Ansible Module by editing the configuration file.
8. Test the configuration by running the command “ansible-playbook –list-tasks”.
9. Run the playbook to deploy the PhoenixNAP BMC Ansible Module.
10. Verify the deployment by running the command “ansible-playbook –list-hosts”.
Introduction
Ansible is open-source server management and automation software that enables Infrastructure as Code (IaC). This tool allows application deployment, provisioning, and configuration management simply and effectively.
Ansible Automation Hub gathers modules from Red Hat and certified partners. phoenixNAP is proud to be a part of the Ansible trusted content collection with the Bare Metal Cloud plugin. This concept that Ansible introduced makes it possible to install cloud providers as additional libraries.
Follow the steps in this guide to install the phoenixNAP BMC Ansible module and learn how to use relevant playbooks.
Prerequisites
- Ansible installed on the control machine
- Python installed on the control machine (available by default)
Benefits of Using PNAP BMC Ansible Module
This IaC tool was designed to allow customers to provision Bare Metal Cloud servers and perform other tasks using simple YAML scripts called playbooks. You can now efficiently automate server creation with immutable provisioning. Besides the benefit of automating IT processes, another bonus is the ability to rerun the same code to revert a server to the original state in case of unwanted modifications.
This model does not have master and slave machines. You use one machine to push the files, i.e., run a script on one or multiple remote hosts. There are no agents on individual nodes that pull information from the main server. Bare Metal Cloud module does not require SSH to run playbooks.
By becoming a certified plugin on Red Hat Ansible Automation Hub, the BMC module installation process is quick and completed using a single Ansible command. Then, you can instruct Ansible to run a script that contains the YAML code with the description of the automation job you want to perform. The module ensures to achieve the end result you specified, and in the correct sequence.
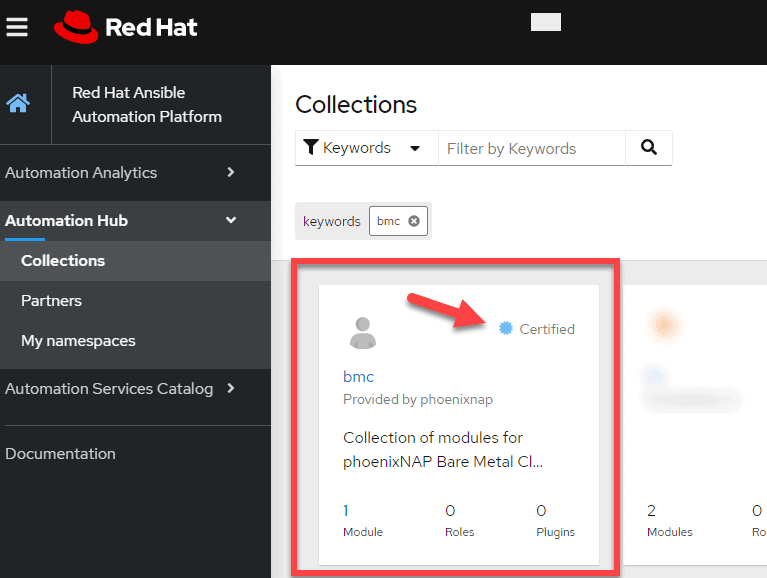
The content in the Ansible Automation Hub is supported by Red Hat and its partners. This way, even the most demanding environments can rest assured that the modules will live up to the expectations.
Install BMC Ansible Module
Before installing the BMC Ansible plugin, you need the Python requests package on your machine. It allows sending different types of HTTP requests.
To install requests, enter:
pip install requests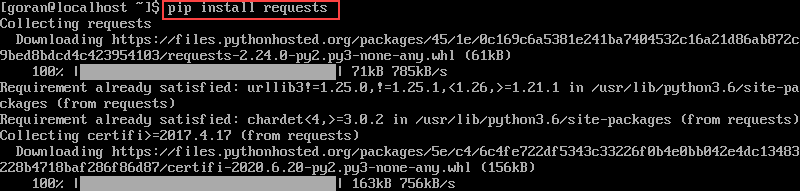
Note: if the pip command does not work on your system, you may try using pip2 or pip3 depending on the Python version you have.
If you are missing the pip package manager, refer to our guides on installing pip.
Then, run the Ansible command to install the phoenixNAP BMC module:
ansible-galaxy collection install phoenixnap.bmc
Once the installation completes, view the module documentation with this command:
ansible-doc phoenixnap.bmc.server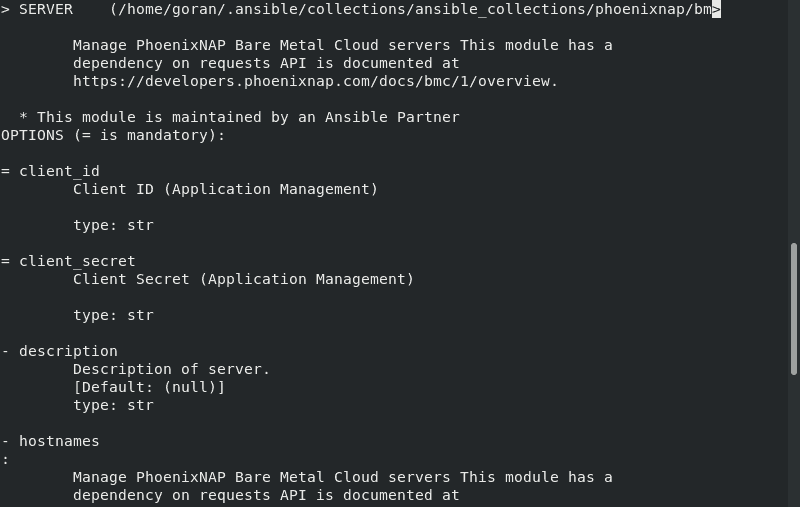
The Ansible BMC plugin depends on API requests. All BMC API requests are documented at the phoenixNAP Developers Portal.
Create Credential File for Authentication
To successfully authenticate with our authorization server, use the Client Credentials grant type.
In your home directory, create a directory .pnap and a config.yaml file inside it.
The file needs to contain the following information:
clientId: myClientId

clientSecret: myClientSecret
Replace myClientId and myClientSecret with your ID and secret.
Ansible phoenixNAP BMC Playbooks
Writing Ansible playbooks does not require special coding skills, and they cover all available BMC APIs. These scripts are written in YAML, a simple serialization language used when creating configuration files. Ansible works by checking the actual states of the servers and compares them with the set of instructions in the playbook.
When the state does not match the defined end result, the module ensures to follow the resource model from the script to reach the set goal.
If you run a playbook more than once, the module will not perform additional tasks. Once the actual state of a BMC server corresponds to the goal of the script, you can execute the script multiple times, and the module will not perform any task.
How to Run BMC Playbooks
The name of a playbook suggests what the script does. For example, playbook_power_off.yml turns off one or more servers.
To run a playbook, use this syntax:
ansible-playbook playbook_name.ymlTherefore, to reset a server, enter:
ansible-playbook playbook_reset.ymlBMC Playbook Examples
The YAML playbook examples we will provide below are similar to one another. The difference is the state of the server you want to achieve. The only file that is slightly more different than others is the script for creating a server.
Every playbook needs to contain one or more hostnames or server_ids, as well as the client_id and client_secret. The preferred method is to enter the values in the ~/.pnap/config.yaml file instead of in each playbook.
Create Server
The name of the playbook: playbook_create.yml
- name: Create new servers for account
  hosts: localhost
  gather_facts: false
  vars_files:
    - ~/.pnap/config.yaml
  collections:
    - phoenixnap.bmc
  tasks:
  - server:
      client_id: "{{clientId}}"
      client_secret: "{{clientSecret}}"
      hostnames: [my-server-red]
      location: PHX
      os: ubuntu/bionic
      type: s1.c1.medium
      state: present
      ssh_key: "{{ lookup('file', '~/.ssh/id_rsa.pub') }}"
Deprovision Server
The name of the playbook: playbook_deprovision.yml
- name: reset servers
  hosts: localhost
  gather_facts: false
  vars_files:
    - ~/.pnap/config.yaml
  collections:
    - phoenixnap.bmc
  tasks:
  - server:
      client_id: "{{clientId}}"
      client_secret: "{{clientSecret}}"
      hostnames: [my-server-red]
      state: absent
Power Off Server
The name of the playbook: playbook_power_off.yml
- name: power on servers
  hosts: localhost
  gather_facts: false
  vars_files:
    - ~/.pnap/config.yaml
  collections:
    - phoenixnap.bmc
  tasks:
  - server:
      client_id: "{{clientId}}"
      client_secret: "{{clientSecret}}"
      hostnames: [my-server-red]
      state: powered-off
Power On Server
The name of the playbook: playbook_power_on.yml
- name: power on servers
  hosts: localhost
  gather_facts: false
  vars_files:
    - ~/.pnap/config.yaml
  collections:
    - phoenixnap.bmc
  tasks:
  - server:
      client_id: "{{clientId}}"
      client_secret: "{{clientSecret}}"
      hostnames: [my-server-red]
      state: powered-on
Reboot Server
The name of the playbook: playbook_reboot.yml
- name: reset servers
  hosts: localhost
  gather_facts: false
  vars_files:
    - ~/.pnap/config.yaml
  collections:
    - phoenixnap.bmc
  tasks:
  - server:
      client_id: "{{clientId}}"
      client_secret: "{{clientSecret}}"
      hostnames: [my-server-red]
      state: rebooted
Reset Server
The name of the playbook: playbook_reset.yml
- name: reset servers
  hosts: localhost
  gather_facts: false
  vars_files:
    - ~/.pnap/config.yaml
  collections:
    - phoenixnap.bmc
  tasks:
  - server:
      client_id: "{{clientId}}"
      client_secret: "{{clientSecret}}"
      hostnames: [my-server-red]
      ssh_key: "{{ lookup('file', '~/.ssh/id_rsa.pub') }}"
      state: reset
Shutdown Server
The name of the playbook: playbook_shutdown.yml
In this example, we used server_ids instead of hostnames.
- name: shutdown servers
  hosts: localhost
  gather_facts: false
  vars_files:
    - ~/.pnap/config.yaml
  collections:
    - phoenixnap.bmc
  tasks:
  - server:
      client_id: "{{clientId}}"
      client_secret: "{{clientSecret}}"
      server_ids:
        - 5eda71ef674cf47bd2599cfa
      state: shutdown
Conclusion
If you followed the steps in this guide you successfully installed the Bare Metal Cloud Ansible Module. We also provided the examples for BMC playbooks that you can use to manage your machines.
By using the trusted Ansible Automation Hub content, such as our BMC module, you can efficiently and securely manage your servers.
Did you know that pNAP products include Colocation and Cloud? You can read more about their advantages and disadvantages for your organization in our article Colocation vs Cloud Computing.
How to Install phoenixNAP BMC Ansible Module
The phoenixNAP BMC Ansible Module is a powerful tool for automating server management tasks. It allows you to quickly and easily configure and manage servers, networks, and other IT infrastructure components. This guide will walk you through the steps of installing the phoenixNAP BMC Ansible Module.
Prerequisites
- Ansible 2.4 or higher
- Python 2.7 or higher
- phoenixNAP BMC API credentials
Step 1: Install the phoenixNAP BMC Ansible Module
The first step is to install the phoenixNAP BMC Ansible Module. To do this, you will need to download the module from the phoenixNAP website. Once you have downloaded the module, you can install it using the following command:
pip install phoenixNAP-bmc-ansibleStep 2: Configure the phoenixNAP BMC Ansible Module
Once the module is installed, you will need to configure it. To do this, you will need to create a configuration file. This file should contain your phoenixNAP BMC API credentials. You can find these credentials in your phoenixNAP account.
Step 3: Test the phoenixNAP BMC Ansible Module
Once you have configured the module, you can test it by running a simple command. This command will check if the module is working correctly. To do this, run the following command:
ansible-playbook -i localhost, test.ymlIf the command runs successfully, you will see a message indicating that the module is working correctly.
Conclusion
The phoenixNAP BMC Ansible Module is a powerful tool for automating server management tasks. By following the steps outlined in this guide, you can quickly and easily install and configure the module. Once you have done this, you can begin using the module to automate your server management tasks.
