Since you are reading this article, you’ve been likely directed to run the Windows SFC utility to fix an error code or issue on your computer, only to run into an SFC error message stating, “Windows resource protection found corrupt files but was unable to fix some of them.” While this is a major pain, there is a solution in sight.
Like all software and Windows processes, the SFC utility can encounter issues during runtime and throw unexpected error messages. We’ll walk you through below what this error message means and how you can fix it, so you can get back to resolving the original issue.

Window System File Checker (SFC) Utility
System File Checker, or SFC.exe, is a command-line utility provided by Microsoft Windows. This utility has been included since Windows 98 and will scan your system and restore any system files that are corrupted. If the SFC utility finds any system file that is missing or has been corrupted, the files should be restored using files within the %WinDir%\System32\dllcache folder.
Starting with Windows Vista, SFC became integrated with Windows Resource Protection (WRP). WRP replaced Windows File Protection and acts to protect any critical system files, folders, and registry keys. Resources protected by WRP are restricted by the Windows Installer (Trustedinstaller) service, with some resources inaccessible even to users with Administrator privileges.
Scenarios where Windows Resource Protection takes action:
- Any application installers attempting to modify, replace, or delete critical Windows files or registry keys will fail to install and will be denied access to these files, prompting an error message.
- Any applications that attempt to remove or add sub-keys to the registry or change the values of protected registry keys will be denied access, and the process will fail, prompting an error message.
- Any applications that attempt to write information into protected registry keys, folders, and files, will fail and receive an error message.
What does the “Windows resource protection found corrupt files but was unable to fix some of them” error mean?
This error means that System File Checker completed the scan of your system but was unable to fix at least some of the corrupt files that it identified.
System files can become corrupted because of software or hardware problems. For example, if data is improperly written or overrides system files, this can cause files to become corrupt.

It’s not possible to completely prevent files from becoming corrupt. Instead, you should regularly scan your system with the SFC utility to catch and fix any corrupt system files.
How to fix the “Windows resource protection found corrupt files, but was unable to fix some of them” error
1. Run the DISM command
DISM, or Deployment Image Servicing and Management, is another command-line utility provided by Windows that repairs WindowsSetup, Windows PE, and Windows images. Often if the System File Checker displays the “Windows resource protection corrupt files, but was unable to fix some of them” error, the System image needs to be repaired.
DISM can fix Component Store Corruption, a known issue that prevents SFC from working correctly. DISM can help solve this issue and allow SFC to complete its scan and repair process without issues.
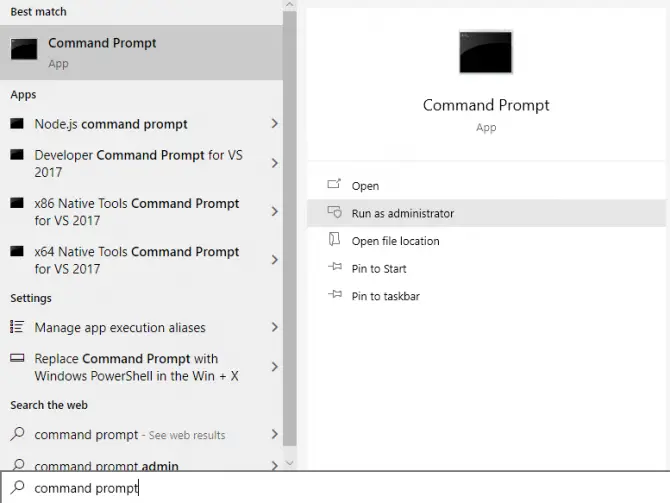
- Click the Windows icon on your Taskbar and enter “Command Prompt”.
- The Command Prompt application will appear. Select Run as Administrator from the list. If your computer asks for permission to make changes, click Yes.
- In the command prompt window, type “DISM /Online /Cleanup-Image /RestoreHealth” and press Enter. Note the spacing, be sure to include a space after DISM, Online, and Cleanup-Image.

- The DISM tool takes 10 to 15 minutes to complete in most cases but can sometimes take more time. The progress bar is not very accurate. The progress bar may not appear for a few minutes, or it may seem stuck at 20 percent. Be patient; DISM is working and will soon complete its scan.
- When the scan is complete, restart your computer. Then, run SFC again to allow the utility to identify and fix any corrupted system files. If the error reoccurs, move on to the next solution.
3. Run the SFC scan from WinRE
Windows Recovery Environment (WinRE) can be used as another option to solve this error with the System File Checker. WinRE is a recovery environment included with Windows 10 and Windows 11. Users can customize WinRE by adding diagnostic tools, drivers, and other components.
WinRE can be a great way to troubleshoot if you don’t have administrator privileges, as most of the functions don’t require it. This guide will explain two methods that you can use to enter WinRE. Follow the instructions below to learn more.
Rapid power cycling method
- Press and hold the power button on your computer casing until your computer powers off.
- Press the power button to turn it on again. As soon as the Windows 10 loading screen shows up, press the power switch and hold until the system powers down again.
- Repeat this 3-4 times.
- After too many failed startup attempts, Windows 10 will automatically boot into the Windows Recovery environment the next time you start the system. Once you have entered WinRE, you can move on to step #5 below.
Microsoft Windows restart method
- Access the lock screen or sign-in screen by pressing the Windows key + L.
- Hold the Shift button. In the bottom right-hand corner, select the Power button.
- Select Restart from the list.
- Allow your computer to restart in the Windows Recovery Environment (WinRE).
If you are having trouble booting into WinRE, read our article covering the Windows RE image was not found error.
Once in WinRE
- Now you are in WinRE and on the Choose an option screen. Select Troubleshoot from the options.

- Once on the Advanced options screen, select Command Prompt.

- The command prompt will instantly open. Type the following command and press Enter to begin the System File Checker scan:
sfc /scannow

3. Run the SFC scan in Safe Mode
Sometimes SFC will run into the “Windows resource protection found corrupt files, but was unable to fix some of them” error because there are unexpected interactions between Windows system files and other Windows services. You can avoid this problem by running the System File Checker utility in Safe Mode.
Booting Windows in Safe Mode is a great troubleshooting tool. When you start your computer in Safe Mode, Windows starts with a limited set of files, services, and drivers. This eliminates most compatibility, software, and other miscellaneous operating system issues. You need to access WinRE to enter Safe Mode.
To boot Windows in Safe Mode and run SFC:
- Repeat the steps to access WinRE from one of the two options in the previous method.
- Once you are on the Windows RE screen, select Troubleshoot.
- From the Advanced Options screen, select Startup Settings, and then click Restart.
- When your PC restarts, you will find yourself on a screen called Startup Settings. There are 9 options available. Press 6 to select Enable Safe Mode with Command Prompt.

- Once your computer restarts, you will have booted into Safe Mode.
- Enter your login and password information as normal. Windows will automatically launch straight to the command prompt window. You will not see the traditional Windows Explorer desktop.
- In the command prompt window, type the following command and press Enter to start the scan:
sfc /scannow - If SFC completed the scan without errors, your issue is resolved. If not, please continue through the solutions.
4. Disk defragment and drive optimization
Hard drives become fragmented over time and may need disk defragmentation. Hard drives write data randomly to a drive based on whatever empty area of the disk is first accessible. As your hard drive fills up, data for the same software may be stored across different areas of the drive.
When you defragment your drive, you consolidate information that should be together in the same area. This will improve performance and free up larger blocks of space on your drive. This process can sometimes fix issues triggering the “Windows resource protection found corrupt files, but was unable to fix some of them” error.
Note: If you have an SSD, you do not need to defragment your drive. This solution is only applicable to users with traditional HDDs.
- Click the Start menu or Windows button and enter “Defrag” into the search bar.

- From the Disk Defragmenter window, select Analyze disk. When finished, you’ll receive a report that indicates if your drive could benefit from being defragmented.

- If the report states that defragmentation is recommended, select Defragment disk.
- Allow for the defragmentation process to complete. This can take a few hours, depending on the size and state of the hard drive.
- Restart your PC and run System File Checker to see if the scan can complete without issues. If not, move to the next method.
5. Manually replace the corrupted files. (Advanced)
If the above methods do not work, the next step is to try and replace the corrupted files manually. In order to do this, you will need to locate and isolate which files are corrupted, and then you will need to get a good copy from another computer that is running the same version of Windows as your computer and replace the corrupt file with the good one.
Use System File Checker to view and locate the corrupt files
- Open up your Command Prompt and run it as an administrator.
- Type in the following command and hit Enter:
findstr /c:”[SR]” %windir%\Logs\CBS\CBS.log >”%userprofile%\Desktop\sfcdetails.txt” - This command will give you a copy of the CBS log. You will need to open up the SFCdetails.txt file from your desktop.
- In this text file, you will see the date/time and then the details about the SFC scan. You’ll want to look for a file that was not repaired. The log will show you the following information: date, time, the file name, the file version, the architecture of the file, and type of file, and what the issue is with the file (corruption/missing).
- Make a note of ALL files that could not be repaired.
Here is an example of a file that cannot be repaired from Microsoft’s Support Page:
- If the report states that defragmentation is recommended, select Defragment disk.
- Allow for the defragmentation process to complete. This can take a few hours, depending on the size and state of the hard drive.
- Restart your PC and run System File Checker to see if the scan can complete without issues. If not, move to the next method.
5. Manually replace the corrupted files. (Advanced)
If the above methods do not work, the next step is to try and replace the corrupted files manually. In order to do this, you will need to locate and isolate which files are corrupted, and then you will need to get a good copy from another computer that is running the same version of Windows as your computer and replace the corrupt file with the good one.
Use System File Checker to view and locate the corrupt files
- Open up your Command Prompt and run it as an administrator.
- Type in the following command and hit Enter:
findstr /c:”[SR]” %windir%\Logs\CBS\CBS.log >”%userprofile%\Desktop\sfcdetails.txt” - This command will give you a copy of the CBS log. You will need to open up the SFCdetails.txt file from your desktop.

- In this text file, you will see the date/time and then the details about the SFC scan. You’ll want to look for a file that was not repaired. The log will show you the following information: date, time, the file name, the file version, the architecture of the file, and type of file, and what the issue is with the file (corruption/missing).
- Make a note of ALL files that could not be repaired.
Here is an example of a file that cannot be repaired from Microsoft’s Support Page:
2007-01-12 12:10:42, Info CSI 00000008 [SR] Cannot repair member file [l:34{17}]”Accessibility.dll” of Accessibility, Version = 6.0.6000.16386, pA = PROCESSOR_ARCHITECTURE_MSIL (8), Culture neutral, VersionScope neutral, PublicKeyToken = {l:8 b:b03f5f7f11d50a3a}, Type neutral, TypeName neutral, PublicKey neutral in the store, file is missing
Manually replace the corrupted files
Once you have a good copy of the file that you are missing, you will need to complete the following steps:
- In your computer’s search menu, type in “CMD” or “Command Prompt”.
- Open up the CMD as an administrator.
- Type in the following command: “takeown /f Path_And_File_Name” and replace “path” and “file name” with the path and file name of the corrupted file. For example: “takeown /f C:\windows\system32\jscript.dll”.
- Now, you will need to grant full access to the corrupted system file. To do this, type in the following command: “icacls Path_And_File_Name /GRANT ADMINISTRATORS:F”. Again, replace “path” and “file name” with the path and file name of the corrupted file. For example: “icacls C:\windows\system32\jscript.dll /grant administrators:F”
- Now that you have taken ownership and have given the administrator full rights to gain access to the corrupted file, you can replace it with a good copy of the file. Here is how to do this: “Copy Source_File Destination” and hit Enter. The “source file” is the path and file name of the known good copy of the file on your computer, and the destination is the path and file name of the corrupted file. So, it would look something like this as an example: “copy E:\temp\jscript.dll C:\windows\system32\jscript.dll”.
6. Clean Windows 10 or 11 install
If replacing the corrupt file with a good copy still has the SFC /scannow failing and the Windows Resource Protection error popping up for you, then we recommend that you perform a clean installation of Windows or a “Fresh Start.”
Warning: Back up your personal data before proceeding with a clean install, as it will erase all information from your system.
- Click the Start button and then select Settings (the gear icon).
- On the Settings page, find and select System.

- Select Recovery from the menu on the left-hand side.
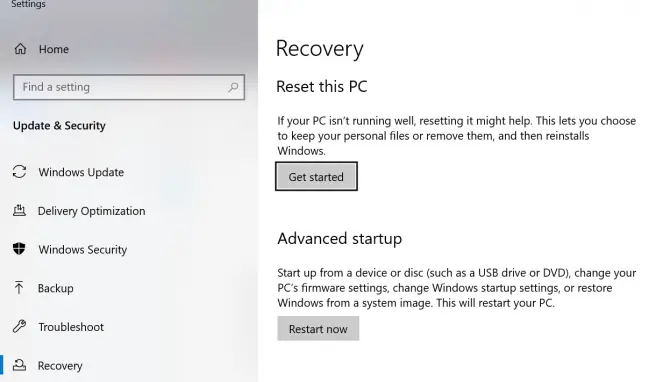
- Under Reset this PC, select Get started.
- You can choose to save your personal files, or you can remove everything. Choose the option that is best for you. If you just want to solve corrupt system files, you will probably want to keep personal files.

- You will then be offered two options for reinstalling Windows, Cloud download or Local reinstall. Choose local to reinstall the same version of Windows that you currently have. Select Cloud download to install the most updated version of Windows available.

- Follow the prompts until you are on the Ready to Reset this PC page. When you are ready to proceed, select Reset.

- The page will transition to Preparing to reset, which may take some time. Your computer will automatically reset when this step is complete.
- When Windows restarts, it will continue to reset, and you will see a progress percentage. Once complete, you will be able to sign in to your account.
- Check if your original error still exists. You may not even need to run an SFC scan.
Resolved: “Windows resource protection found corrupt files, but was unable to fix some of them” error fixed
If you followed along with the six solutions outlined in this guide, you tried the DISM command, ran SFC from the Windows Recovery Environment, ran SFC from Safe Mode, defragmented your hard drive, and reinstalled Windows 10. The solutions have proven effective for users in fixing Component Store Corruption and other issues that prevent System File Checker from completing its scan.
