Visiting a web page should be just a click away. But sometimes, things don’t go as smoothly as planned. An err_proxy_connection_failed error may annoyingly pop up and hinders you from accessing the web pages you want to see, whether for personal or professional reason.
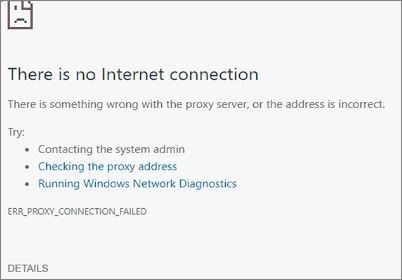
Internet browsing can sometimes be frustrating, primarily when a message covers the screen, seemingly shouting, “Cannot connect!” The entire pop-up message you see may look something like the image above.
The “ERR_PROXY_CONNECTION_FAILED” Google Chrome error is an issue that many users face. While some just opt to walk away, there are others who want to find a way to troubleshoot it. Let’s learn the meaning of this error and how to fix it once and for all.
What Does the err_proxy_connection_failed Error Mean?
The err_proxy_connection_failed error indicates that there is something wrong with the proxy server or that the IP address is incorrect. Your browser wouldn’t connect to the internet as the proxy connection won’t allow it.
Sadly, this error code means you can’t browse with Chrome until the problem gets fixed. Among the most common causes are the proxy connection being invalid, or a third party controlling the proxy configuration.
Let’s talk about why there is a proxy server and how to fix the issue so you can connect to the internet and go about your day as planned.
What is a Proxy Server?
A proxy server is an intermediary server that separates networks or services and acts like a gateway between the person trying to use the World Wide Web. The internet traffic first goes through a proxy server before connecting to the internet and then forwards the website data back to you. Reasons to use a proxy server include:
- Security concerns on an open Wi-Fi network
- Sometimes people in a foreign land use a proxy server to access content not allowed in their country.
- Companies use a proxy to help prevent data breaches from hackers breaking through their firewalls.
Every device connected to the internet needs to have a unique IP address. Think of it like your home address where other people can find you. Proxy servers connect the Private Internet Protocol IP address and another server on the internet.
Proxy servers have a public IP address on the internet that your computer or mobile device recognizes. They help:
- Promote web traffic anonymity
- Control or monitor internet usage by blocking undesirable content
- Balance web traffic to prevent overwhelming the servers by storing data on multiple servers
- Create faster network speeds
Why You Might See the err_proxy_connection_failed Error
When you try to connect to a web page, but something goes wrong with the communication between the proxy server and an IP address, you will see an error.
Besides the “Aw, Snap!” message that means your browser crashed or something went wrong in the Chrome browser, a code appears beginning with “ERR”. This indicates an error occurred and the following words give more insight into what kind of error.
Other examples of Google Chrome errors are ERR_CONNECTION_RESET, which happens when there’s a misconfiguration in your internet settings, and ERR_CONNECTION_TIMED_OUT, which commonly occurs when the website you are accessing takes too long to respond to the request. We actually have several articles that address various Google Chrome errors, besides those we mentioned.
9 Proven solutions to fix the err_proxy_connection_failed Error
You’ve encountered a browser-based error when you see ERR_PROXY_CONNECTION_FAILED on your screen, which is indicative of a problem with the proxy settings.
This message pops up and blocks the web page you are trying to view. It’s irritating, but don’t worry. There are surefire solutions for the ERR_PROXY_CONNECTION_FAILED error so you can use Chrome again in no time.
1. Try A Different Browser
The first step is to try a browser other than Chrome such as Firefox, Edge, or even Safari if you are a Mac user. If this fixes the issue, it’s time to update your Google Chrome or reinstall the browser.
2. Check the Firewall and Antivirus
Your firewall or antivirus settings can also cause this error. Test this by disabling them and then try to connect to a web page. If you no longer get the error message, access the firewall and the antivirus settings to see how they are configured.
Try temporarily disabling the Windows firewall using the steps below and see if that fixes the issue. If there is no change, check the antivirus settings.
- Go to the Start menu
- Type Windows Firewall
- Click Turn Windows Defender Firewall On or Off
- Turn off Windows Firewall (It will say not recommended, but don’t be alarmed by this. You are only temporarily disabling it as a test).
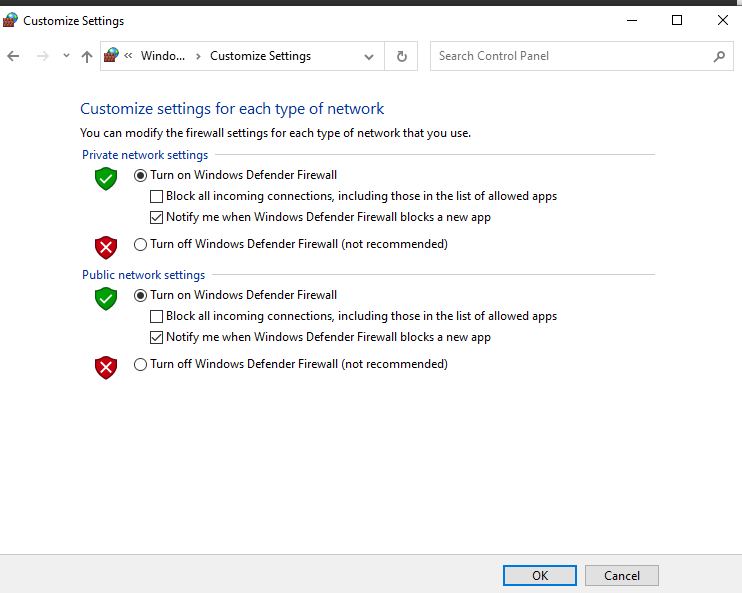
To turn the firewall back on, follow these steps:
- Go to start menu
- Type Windows Firewall
- Turn Windows Firewall On for both Private and Public networks.
3. Check Browser Extensions
Faulty browser extensions could also cause the issue in Chrome. If you used an extension when the error appeared, try disabling it, then check to see if the error pops up again. If that fixes the issue, either remove the extension or update it.
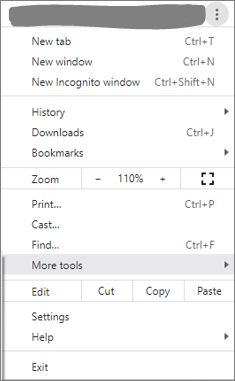
To deactivate all browser extensions in Google Chrome, follow these steps:
- Click on the three-dot icon at the top right of the browser screen
- Select more tools
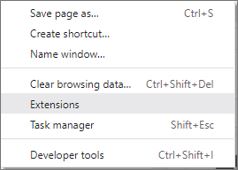
- Click on Extensions (shown below)
- Click Activate/Deactivate toggle in the extension box
- Deactivate by clicking on the toggle in the right corner next to the Remove button
To remove the extension:
- Click on the three-dot icon
- Select More tools
- Click on Extensions
- Click on activate/deactivate toggle in the extension box
4. Use a LAN Connection
Another quick fix is to restart your router or try to connect with a LAN connection.
- Click the Windows Key
- In the Search Bar, Type: Control Panel

- Select Network and Internet
- Select Internet Options

- Select the Connections tab
- Select the LAN settings from the menu
- Make sure the Proxy Server is unchecked
- Check Automatically Detect Settings and make sure all other boxes are not checked.

- Click OK
- Click Apply
- Reboot
5. Check the Registry Files
The registry files provide a smooth, carefree user experience unless a malicious or inappropriate software update interferes with the Registry and corrupts the files. A corrupt file on the Registry could prompt an ERR_PROXY_CONNECTION_FAILED error code. To fix this, Install a registry cleaning software like C-cleaner and clean the device’s Registry.
If the error persists, there are still four possible fixes:
- Check Proxy Settings
- Disable Proxy Temporarily
- Reset TCP/IP
- Renew IP Address
6. Check the Proxy Settings
The proxy settings need to be 100% correct. Incorrect proxy settings could cause the error to appear. First, check the Wi-Fi network, then the Proxy Settings using the following steps:
- Click the Windows Key
- In the Search Bar, Type: Settings

- Select Network and Internet

- Tap on Proxy

- Under Proxy Settings, you can configure it manually
- Type the IP address and Port

- Click Save
To fix improper proxy settings / ensure they have the correct settings:
- From a laptop, click the Windows Key.
- Type Control Panel and select the search results by clicking
- Select Network and Internet
- Select Internet Options
- Select the Connections tab from the top of the window
- At the bottom of the window, click on LAN settings.
- Look to see if the Use a Proxy Server is unchecked. This option is the third checkbox down in the list. If it is checked, click on the checkmark to remove it. It applies to dial-up or VPN connections if checked with a tick.
- Ensure the Proxy Server box is unchecked, and click OK to save the changes.
After making these changes, try to visit a web page. If it still doesn’t work, try the next solution.
7. Temporarily Disable Proxy
Since this step will change the Registry settings, create a registry backup by expanding the File tab and clicking on Export before attempting these next steps:
- Press the Windows key + R to open the Run box
- Type: Regedit
- Click OK to open Registry Editor (Note: Before making changes to the Registry, back up the individual registry key.)
- Find the path: HKEY_CURRENT_USER → Software→Microsoft→Windows→Current Version→Internet settings
- Right-click the Proxy Enable key in the right panel
- Delete: ProxyOverride, MigrateProxy, and ProxyServer
- Reboot the computer
- Try to connect to a web page
If the error persists, move to the following troubleshooting method.
8. Reset TCP/IP
TCP stands for Transmission Control Protocol, a communications standard that enables application programs and devices to exchange messages over a network.
The Internet Protocol (IP) sends data from one device to another across the internet between computers and networks. Every device has its specific IP address.
The communication works through the Internet Protocol Suite, TCP/IP, a group of communications protocols, split into four layers. Sometimes, the TCP/IP needs to reset for devices to connect through the Proxy to the internet.
Reset the TCP/IP by following these steps:
- Press the Windows Key + R to open the Run box
- Type: cmd
- Press Control + Shift + Enter to open the Command Prompt as an administrator
- Type: netsh winsock reset – Hit Enter
- Type: netsh int tcp reset – Hit Enter
- Type: netsh int IP reset – Hit Enter
- Type: Exit – Hit Enter to close the Command Prompt
- Reboot Windows
If you still see an error when connecting to a web page, try the next and final option to solve this issue.
9. Renew IP Address
A computer on the internet can have either a static or a dynamic IP. Most use a dynamic IP assigned to a network as needed and changes over time. A static IP address stays the same.
If you use a static IP address, you must set it again once you turn on the computer. It is also possible that issues with the IP address can cause the error message. Releasing and renewing the IP address could help. Do so by following these steps:
- Right-Click on the Windows Key to open the Command Prompt
- Select Command Prompt/Admin
- Type: ipconfig /release then hit Enter
- Type: ipconfig /flushdns then hit Enter
- Type: ipconfig /renew then hit Enter
- Type: Exit then hit Enter to close the Command Prompt
- Restart your computer
Fixed: err_proxy_connection_failed Error in Google Chrome
We presented 9 possible solutions to overcome the err_proxy_connection_failed Google Chrome error so you can go back to browsing the internet and accessing the sites you need. We started with simpler options such as trying another browser and temporarily disabling the firewall or antivirus setting.
Then we progressed to more complex solutions in case the first few methods did not work, such as temporarily disabling the proxy setting, resetting the TCP/IP, and renewing the IP address. We believe that we covered all the bases in solving this issue but we would welcome any other input or comments from you regarding this matter. Most of all, we hope that we were able to provide you with some assistance with your technical woes.
Discover more from Jassweb
Subscribe to get the latest posts sent to your email.
