Introduction
Mod_rewrite is an Apache module that allows you to rewrite URLs on your web server. It is a powerful tool that can be used to improve the usability and security of your website. With mod_rewrite, you can create custom URLs that are easier to remember and easier to type. You can also use mod_rewrite to redirect visitors from one page to another, or to block certain types of requests. In this tutorial, we will show you how to configure mod_rewrite on your Apache web server.
How to Configure mod_rewrite
1. Enable mod_rewrite in Apache
The first step is to enable mod_rewrite in Apache. This can be done by editing the Apache configuration file (usually httpd.conf) and adding the following line:
LoadModule rewrite_module modules/mod_rewrite.so
2. Allow .htaccess Overrides
The next step is to allow .htaccess overrides. This can be done by editing the Apache configuration file (usually httpd.conf) and adding the following line:
AllowOverride All
3. Create a .htaccess File
The next step is to create a .htaccess file in the root directory of your website. This file will contain the rewrite rules that you want to use.
4. Add Rewrite Rules
The last step is to add the rewrite rules to the .htaccess file. These rules will tell Apache how to handle requests for certain URLs.
For example, if you want to redirect all requests for example.com/foo to example.com/bar, you would add the following rule to the .htaccess file:
RewriteRule ^foo$ bar [R=301,L]
This rule will redirect all requests for example.com/foo to example.com/bar with a 301 redirect.
Once you have added the rewrite rules to the .htaccess file, you can test them by accessing the URLs in your browser. If everything is working correctly, you should see the expected results.
Introduction
The mod_rewrite module is a rule-based Apache engine for rewriting URLs. The rules allow writing various queries to change URLs into the desired format. Some applications include page redirecting or proxy fetching.
This article shows how to set up, configure, and rewrite URLs using mod_rewrite.

Prerequisites
What Is mod_rewrite in Apache?
The mod_rewrite Apache module helps manipulate URL requests on the server’s side. Rules and patterns check an inputted URL through regular expressions and variables to extract information and serve the desired page.
For example, if a requested URL is in the following format:
example.com/foo/barThe mod_rewrite module helps translate the URL into something the server understands how to handle:
example.com/foo.php?id=barAllowing the first format comes with a few benefits:
- The URL is less cryptic, more memorable, and easier to replicate from a user’s perspective.
- Search engines extract semantic meaning from the first URL format.
- A user is unaware that the foo.php page exists as a file from the first URL, which is essential from a security perspective.
The mod_rewrite module does not prettify a URL. Instead, it turns pretty links into HTTP requests the server knows how to handle.
How to Use mod_rewrite?
To use the mod_rewrite module, Apache requires:
- Enabling the module.
- Configuring the server.
- Setting up the .htaccess file.
The configuration for mod_rewrite and URL rewriting is an easy two-step process.
Enable mod_rewrite
To enable mod_rewrite, open the terminal and run:
sudo a2enmod rewrite
The command outputs a message that the module is enabled or is already active. Restart the Apache service to apply the changes:
sudo systemctl apache2 restartThe new configuration is now running.
Configure .htaccess to Override Website Configs
The .htaccess file modifies website details without changing the configuration files. Store the file appropriately because it affects all other files in the current directory and subdirectories.
The example project is in the /var/www/html/ directory.
1. Create the .htaccess file in the website directory:
sudo touch /var/www/html/.htaccessNext, configure .htaccess to override website configuration:
2. Open the apache2.conf file:
sudo nano /etc/apache2/apache2.confMaking changes requires sudo privileges.
3. Locate the following section:
<Directory /var/www/html>
        Options Indexes FollowSymLinks MultiViews
        AllowOverride None
        Require all granted
</Directory>
Change the AllowOverride option from None to All:
<Directory /var/www/html>
        Options Indexes FollowSymLinks MultiViews
        AllowOverride All
        Require all granted
</Directory>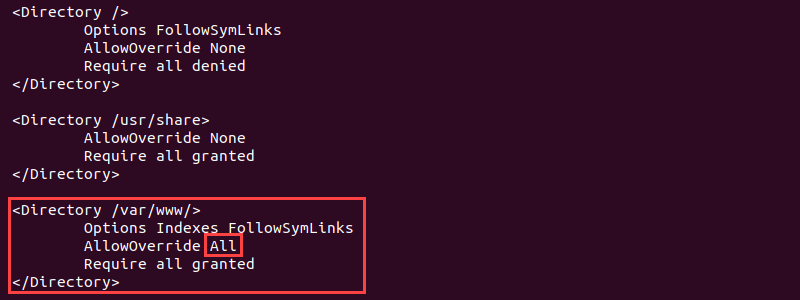
Save the file and close (CTRL + X, Y, Enter).
4. Restart the Apache service:
sudo systemctl apache2 restartThe .htaccess file now overrides all other configurations, allowing URL rewrites.
mod_rewrite Directives
The URL rewriting operations occur in the .htaccess file and consist of various directives. Some of the available directives are:
1. RewriteEngine is the engine that enables or disables the runtime. The syntax is:
RewriteEngine On|OffBy default, the RewriteEngine is off. Control the runtime processing by switching the directive on or off.
2. RewriteCond is a directive that stores the conditions under which rewrites happen. It has the following syntax:
RewriteCond TestString ConditionPattern [Flags]RewriteCondis the directive keyword for a single condition. Multiple condition directives are possible before a single rule.TestStringcontains plain text and additional constructs, such as backreferences or server variables.ConditionPatternis a Pearl Compatible Regular Expressions (PCRE), which applies to theTestString.
3. RewriteRule are the rules which the rewrite engine runs. The syntax looks like this:
RewriteRule Pattern Substitution [Flags]RewriteRuleis the directive keyword for a single rule instance. Multiple rules are possible, and order is important.Patternis the regex pattern to match a part of the requested URL. The mod_rewrite module uses Pearl Compatible Regular Expression (PCRE) syntax.Substitutionis the actual URL to the information we want to show.[Flags]is an optional parameter that changes the expression’s behavior.
4. RewriteMap is a mapping function for a key lookup. The syntax is:
RewriteMap MapName MapType:MapSource [MapTypeOptions]RewriteMapis the directive keyword for the mapping function.MapNameis the name of the function and the way to reference it to aRewriteRule.MapTypestates the file type of theMapSource. TheMapTypeOptionsalso depend on theMapType.MapSourceis the path to the file containing mapping information.
URL Rewrite Examples
The best way to understand mod_rewrite directives is through practical use cases. Below are a few typical examples to demonstrate how mod_rewrite works.
Write Contents from One Page on Another Page
A simple example of a URL rewrite is when requesting one page, we serve the contents of another page. This use case applies to situations where we want to replace an old page with new content without changing the URL.
The .htaccess file looks like the following:
RewriteEngine On
RewriteRule ^old.html$ new.html [NC]
- Line 1 enables the rewrite engine.
- Line 2 contains the
RewriteRuledirective:- The pattern
^old.html$matches the page which starts (^) and ends ($) withold.html. - The substitution is the
new.htmlpage. - The flag
[NC]means the pattern is not case-sensitive.
- The pattern
When a user tries to access the old page, the server shows the contents from the new.html page instead.
Backreferencing RewriteRule Parameters
For a user accessing a URL in the following format:
http://example.com/product/foo/barThe rewritten URL request has the following format:
http://example.com/request.php?id=foo&name=barThe .httaccess URL rewrite contents are:
RewriteEngine On
RewriteRule ^product/([A-Za-z]+)/([A-Za-z]+)$ request.php?id=$1&name=$2
The rewrite rule takes the pattern from the parenthesis and stores it in the reference variables. The reference parameters go from $1 to $9.
RewriteCondition Directive
The RewriteCondition directive helps create a constraint to RewriteRules. In other words, the condition tells the RewriteRule under which circumstances to apply the rewrite.
The condition helps provide a general constraint. For example, if all the web page extensions are migrated from HTML to PHP, the rewrite helps redirect all requests ending in .html to .php.
The .htaccess file looks like this:
RewriteEngine On
RewriteCond %{HTTP_HOST} !php$
RewriteRule "^(.*).html$" "$1.php"
RewriteCond consists of:
%{HTTP_HOST}is the test string. Specifically, it is a server variable with the complete HTTP host.!php$is the condition pattern that looks for all requests not ending in .php.
RewriteRule acts only in case the RewriteCondition evaluates to true. The rewrite is:
"^(.*).html$"is the pattern match. The rewrite pattern specifically looks for requests starting with any characters and ending with .html."$1.php"is the substitution. The$1backreferences the string before.html((.*)) and adds.phpat the end.
RewriteCond helps perform any migration quickly, allowing a quick redirect from old pages or domains to new ones.
RewriteEngine Directive
The RewriteEngine directive is how every .htaccess file begins – switching the RewriteEngine on oand off controls whether the rewrites happen. The feature is handy for debugging and testing purposes.
Another use case of the RewriteEngine is to “comment” sections in the .htaccess file. For example:
RewriteEngine On
RewriteCond %{HTTP_HOST} !php$
RewriteRule "^(.*).html$" "$1.php"

RewriteEngine Off
RewriteRule ^old.html$ new.html [NC]

RewriteEngine On
RewriteRule ^product/([A-Za-z]+)/([A-Za-z]+)$ request.php?id=$1&name=$2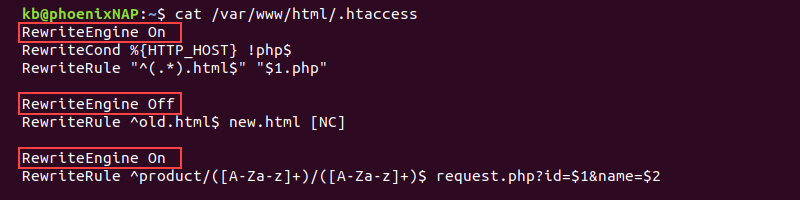
Turning the RewriteEngine off for rules and conditions means that mod_rewrite does not execute the rewrite rules until the engine is on again.
RewriteMap Directive
The RewriteMap directive helps enhance rule substitution strings. For an example URL in the form:
http://example.com/product/databaseThe rewrite requirement is:
http://example.com/products.php?id=272Instead of searching for the product ID by hand, use RewriteMap and provide a file with key-value pairs containing the product names and IDs.
The following example demonstrates how to map from a file.txt with key-value pairs:
database 272
server 273
cloud 274
The rewrite file looks like the following:
RewriteEngine On
RewriteMap prodID "txt:/path/to/file.txt"
RewriteRule "^product/(.*)" "products.php?id=${prodID:$1}"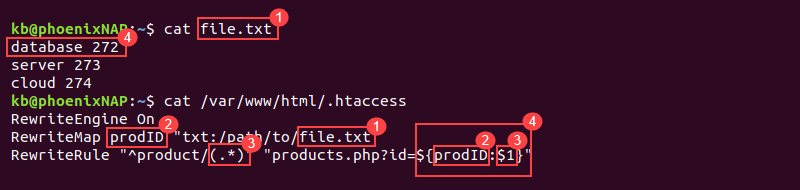
The file has the following structure:
1. file.txt is the file with key-value pairs. Rewrite map uses the information as a reference.
2. prodID is the map name. The name helps reference the function in the rewrite rule substitution.
3. (.*) is the string in the URL or the product name (database, server, cloud). The map function uses the value to search the file.txt for the corresponding ID.
4. ${profID:$1} maps the product name to an ID and returns the ID from the file.
The RewriteMap directive offers various map types. For example, the randomized plain text map type (rnd) helps create load balancing solutions, while the databases map type (dbd or fastdbd) uses a SELECT statement to fetch data.
Conclusion
After going through the steps and examples in this guide, you should know how to activate and use mod_rewrite. The examples show how to use the mod_rewrite module for fundamental rewriting problems.
Next, see how you can use the curl to control the user agent for testing and debugging.
How to Configure mod_rewrite
mod_rewrite is an Apache module that allows you to rewrite URLs on your web server. It is a powerful tool that can be used to improve the usability and security of your website. In this tutorial, we will show you how to configure mod_rewrite on an Apache web server.
Prerequisites
Before you begin this guide you’ll need the following:
- Access to an Apache web server
- Root access to the server
Step 1 — Enabling mod_rewrite
The first step is to enable mod_rewrite on your Apache web server. To do this, you will need to edit the Apache configuration file. The location of this file will vary depending on your operating system.
On Ubuntu and Debian systems, the configuration file is located at /etc/apache2/apache2.conf. On CentOS and Red Hat systems, the configuration file is located at /etc/httpd/conf/httpd.conf.
Open the configuration file in your text editor:
sudo nano /etc/apache2/apache2.conf
Look for the following line:
#LoadModule rewrite_module modules/mod_rewrite.so
Remove the # character to uncomment the line and enable the module:
LoadModule rewrite_module modules/mod_rewrite.so
Save and close the file when you are finished.
Step 2 — Configuring mod_rewrite
Once mod_rewrite is enabled, you can configure it by editing the Apache configuration file. Open the configuration file in your text editor:
sudo nano /etc/apache2/apache2.conf
Look for the <Directory> section and add the following line:
AllowOverride All
This will allow the use of .htaccess files to override the Apache configuration. Save and close the file when you are finished.
Step 3 — Restarting Apache
Once you have enabled and configured mod_rewrite, you will need to restart Apache for the changes to take effect. On Ubuntu and Debian systems, you can restart Apache by typing:
sudo service apache2 restart
On CentOS and Red Hat systems, you can restart Apache by typing:
sudo service httpd restart
Conclusion
You have now successfully enabled and configured mod_rewrite on your Apache web server. You can now use mod_rewrite to rewrite URLs on your web server.
