If you perform development tasks on a live website, you risk publishing bugs, losing data, or causing downtime. Therefore, to avoid these problems, consider creating a clone website.
By learning how to clone your website, the duplicate version can be a safe environment for deploying updates and other modifications. Since it is an identical copy of your site, cloning can also help you migrate your content to another host or domain.
In this post, we’ll explain the benefits of cloning your website. Then, we’ll show you how to do this using three different methods. Let’s get started!
Why Should You Consider Cloning Your Website
Essentially, cloning involves creating a fully working copy of a website. This process will duplicate your WordPress pages, posts, databases, and other files. The duplicate will be identical to your original site, but they will exist independently of each other.
It’s important to note the difference between backing up a website and making a cloned copy. You’ll create a functional duplicate of your live site during the cloning process. However, backups involve storing a static copy of your files that you can restore if a mishap occurs.
You may have to migrate your site to another host or move it to a new domain. While this process is typically complicated, cloning can smooth the transition. Once you learn how to copy a website, you can move your content without negatively impacting traffic levels.
A cloned website can also act as an effective WordPress staging environment. Since the new copy won’t affect the original site, you can use it to update plugins, themes, and other software. You can also test software compatibility and avoid accidentally publishing bugs that might cause downtime.
Here are other practical uses why you should consider learning how to duplicate a website:
Finally, cloning can be a valuable skill for developers. You can either use a cloned site as a testing environment or make changes to a local site and copy the finished version to the client’s server.
How to Clone a Website (3 Methods)
Now that you know about website cloning and its many benefits, it’s time to make a copy of your site. By following our guide, you’ll learn how to create a safe environment for migration, development changes, and more!

1. Use hPanel Copy Website Feature
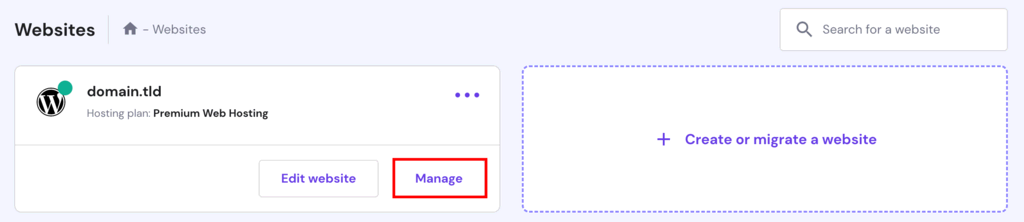
If you use Hostinger, the easiest way to clone your website is with the copy website feature. Open the Websites section and select Manage near your preferred domain:
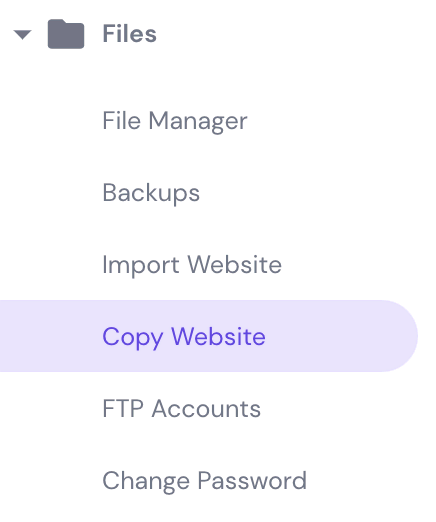
From there, search for Copy website in the left sidebar:
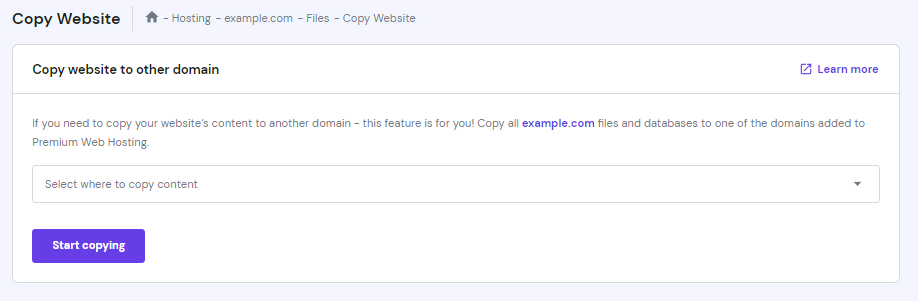
Then, all you will need to do is select the destination domain and click on the Start copying button:
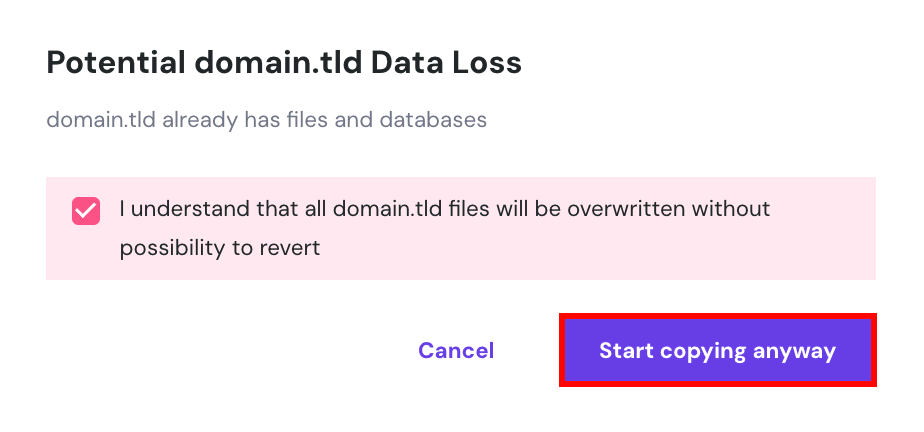
Keep in mind that the data of the destination domain will be overwritten. Click the checkmark and select Start copying anyway:
That’s it. Your website files and databases are now copied to the new domain.
Important! The Copy website feature only works if both domains are hosted on Hostinger. It’s also important to note that email accounts, FTP accounts, and SSH keys won’t be copied
2. Install a Cloning Plugin
As a WordPress user, you probably already know how useful plugins can be. To avoid editing core files, potentially breaking your site, you can install Duplicator. This free and beginner-friendly WordPress plugin helps you easily clone and migrate your site files.
Before we start using Duplicator, you’ll need to set up a local environment or create an account with your new web host. This will allow you to host your site’s cloned copy once you make one.
Step 1: Download a Duplicator Package
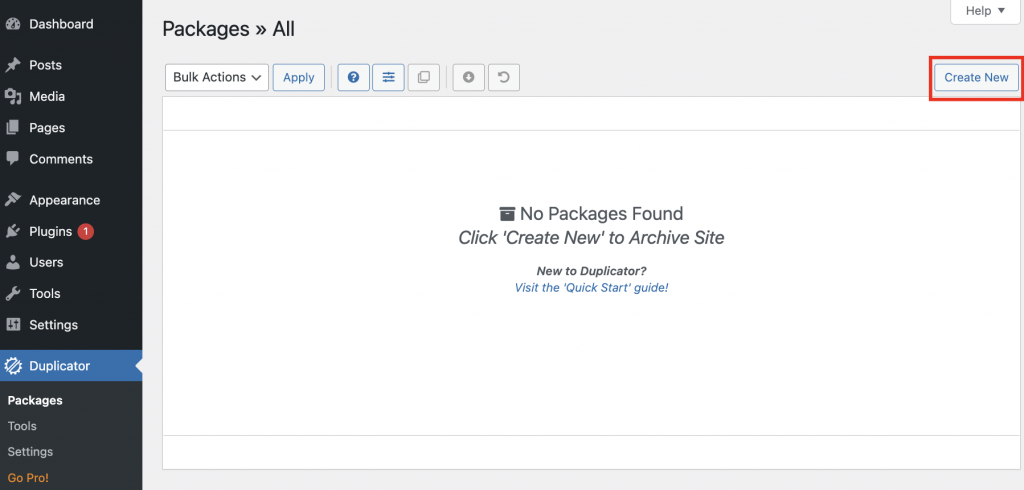
On your original website, install and activate the Duplicator plugin. After this, go to Duplicator → Create New.
This will allow you to create a new package. This package will contain a set of files that use standalone installers to create and set up a cloned version of your website.
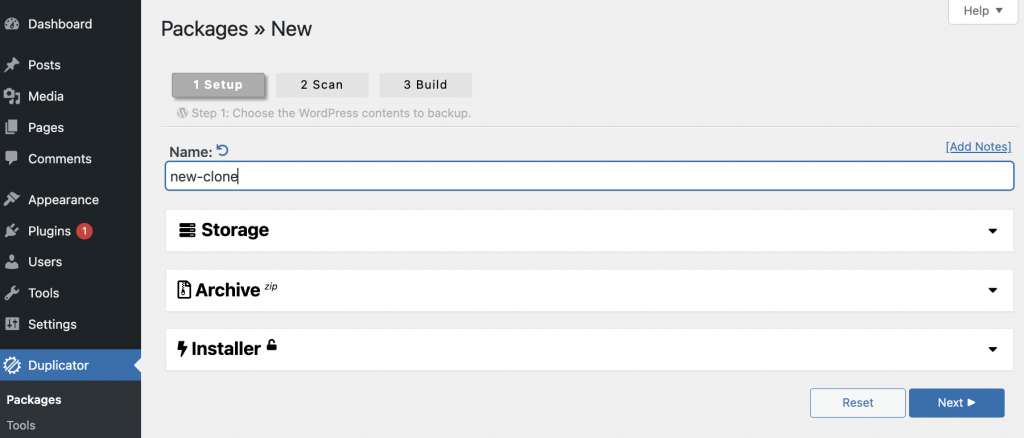
To start building your package, make a name for it. You’ll also be able to choose a different storage location, select a specific database and archive files, and customize the installer. When you’re finished, click Next.
Then, Duplicator will scan your website to identify if any issues might halt the cloning process. Once this scan is complete, you’ll be presented with a summary report.
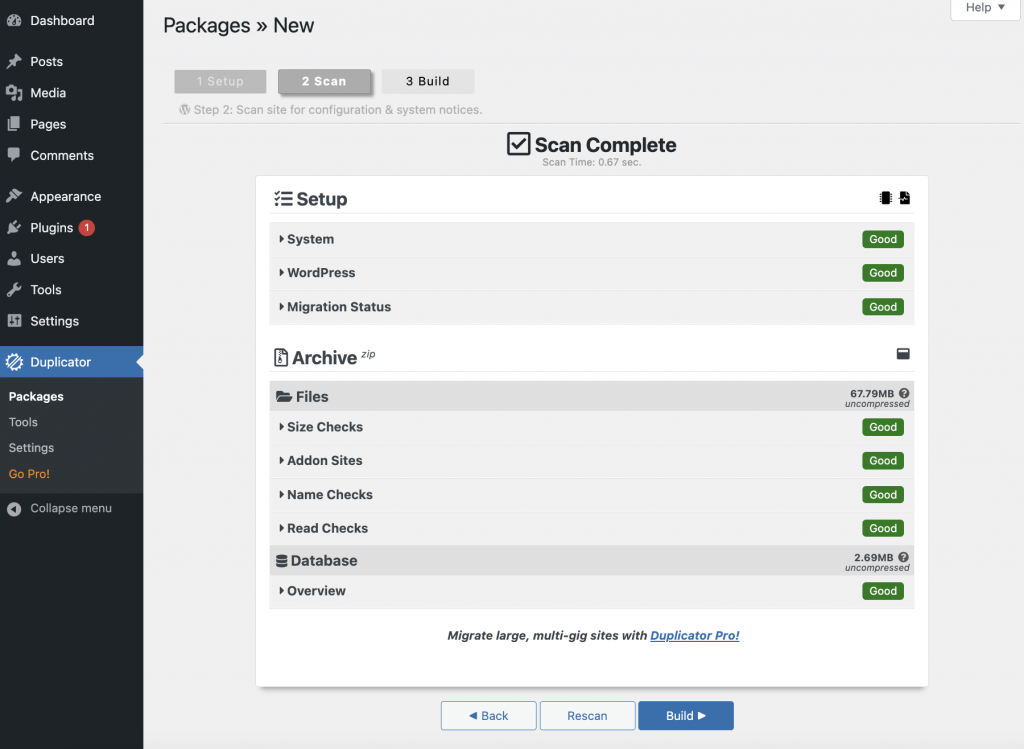
If every field scores a Good rating, you can continue. To finish creating a clone website, hit Build. The plugin will compress your database files into a package to download.
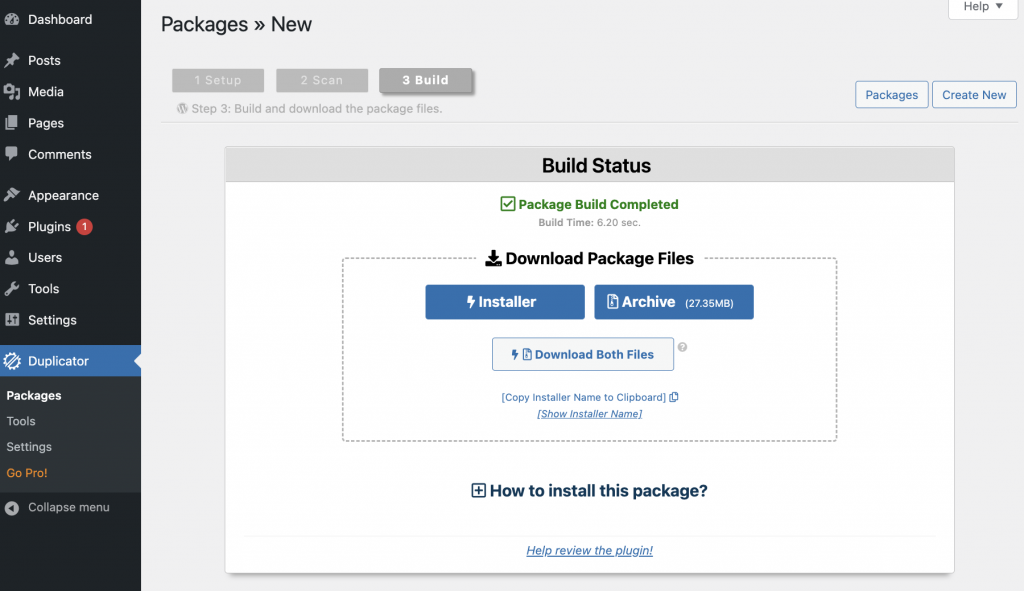
You’ll need to download two files – your site files and Duplicator’s installer. You can download each individually or hit Download Both Files.
Step 2: Upload the Cloned Files
You’ll need to upload these files to their new location for the next step. If you’re migrating your website to another hosting provider, you can open your site files with an FTP client or your host’s file manager.
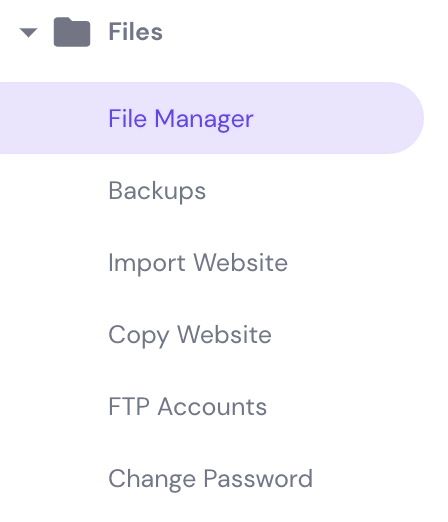
For example, if you have one of Hostinger’s web hosting plans, you can log into hPanel. Then, click on Manage next to your hosting plan. In the Files section, select File Manager.
This will open the file manager for your website, which is typically simpler to use than an FTP client like FileZilla. In your files, find the root directory, usually the public_html folder.
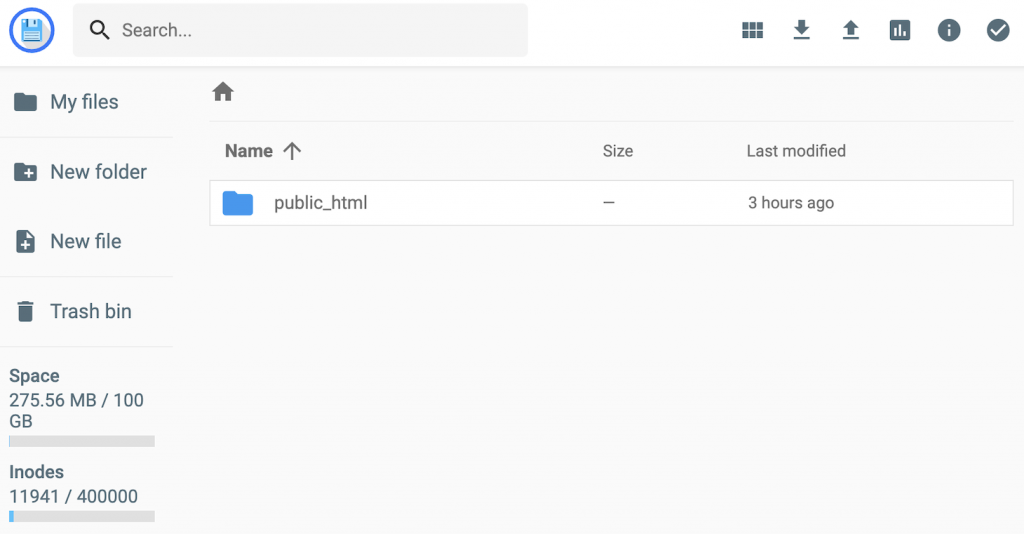
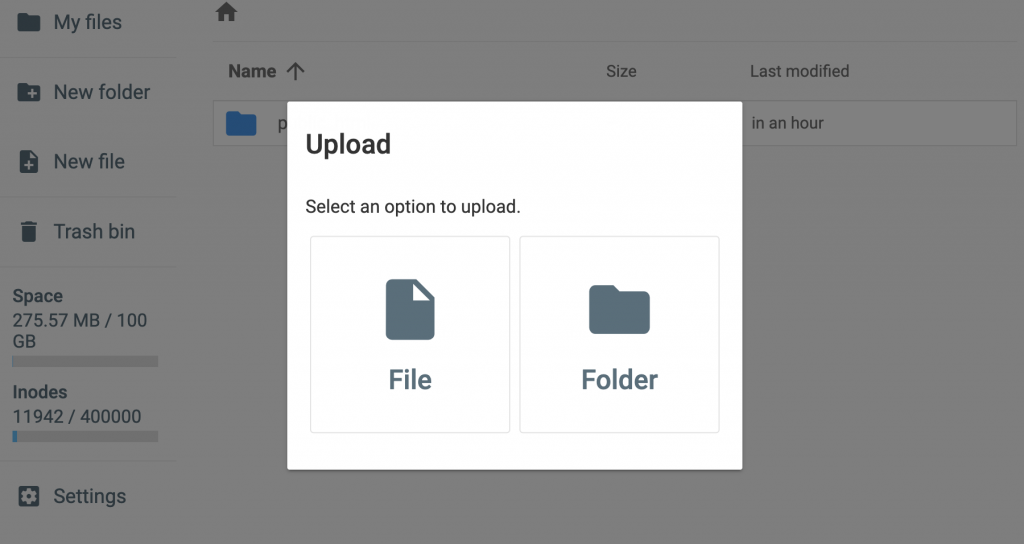
Be sure this folder is empty. Then, click on the Upload button in the top-right corner. In the pop-up window, select File and upload the two files.
Alternatively, you can clone your website to a local environment. In this case, you can create a new folder within the root directory of your local server files.
The location of your root folder will vary depending on your local software. Here are some paths for a couple of default options:
- MAMP: /Applications/MAMP/htdocs/
- WAMP: C:\wamp\www\
Once you find the root directory, open it and create a new folder. Here, you can add the installer and zipped archive file.
Step 3: Create a Database
Every WordPress installation requires a database to store its information, so you’ll need to create one for your cloned site. In hPanel, navigate to Databases → MySQL Databases.
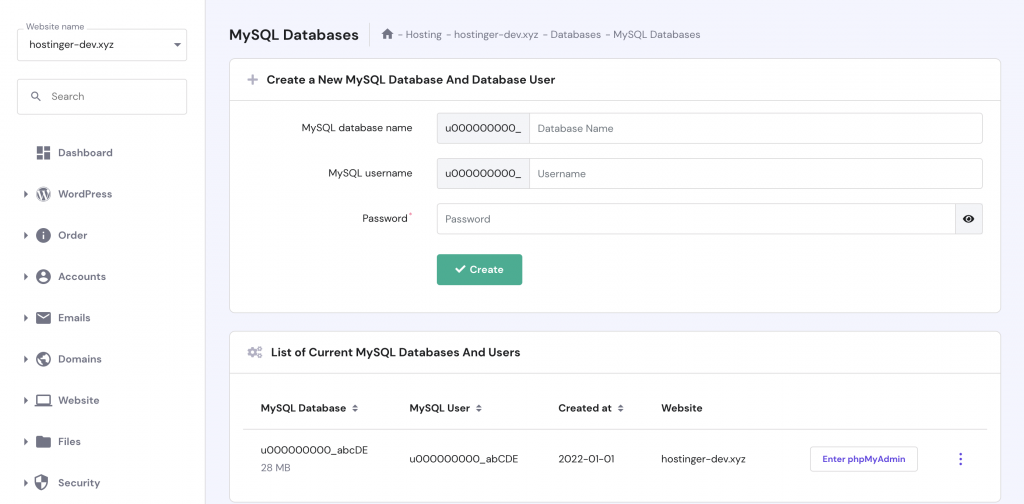
At the top of the page, enter the new database’s name, username, and password. We also recommend making a note of this information for later use. When you’re done, select Create.
Then, you’ll see your new database listed at the bottom of the page. You can select the three-dot icon to change settings like user permissions or passwords if needed.
If you’re using a local server, visit http://localhost/phpmyadmin/ or http://localhost:8080/phpmyadmin/. Once phpMyAdmin launches, click on the Databases tab.
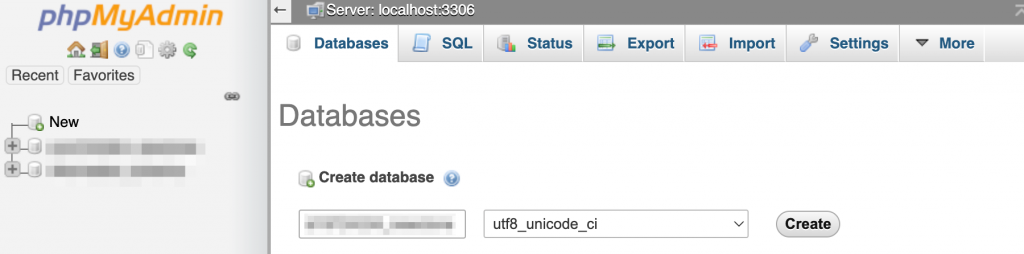
Enter a name for the database and click on Create. Once you have a new database, continue to the next step.
Step 4: Run the Duplicator Installer
After your files and database are configured, it’s time to run the installer script created by Duplicator. You’ll simply need to open a browser window and visit your site’s URL, adding installer.php at the end.
Here’s an example:
https://example.com/installer.php
Keep in mind that you’ll need to update this example with your unique domain name. If you’re using a local environment, you’ll also need to use the localhost address.
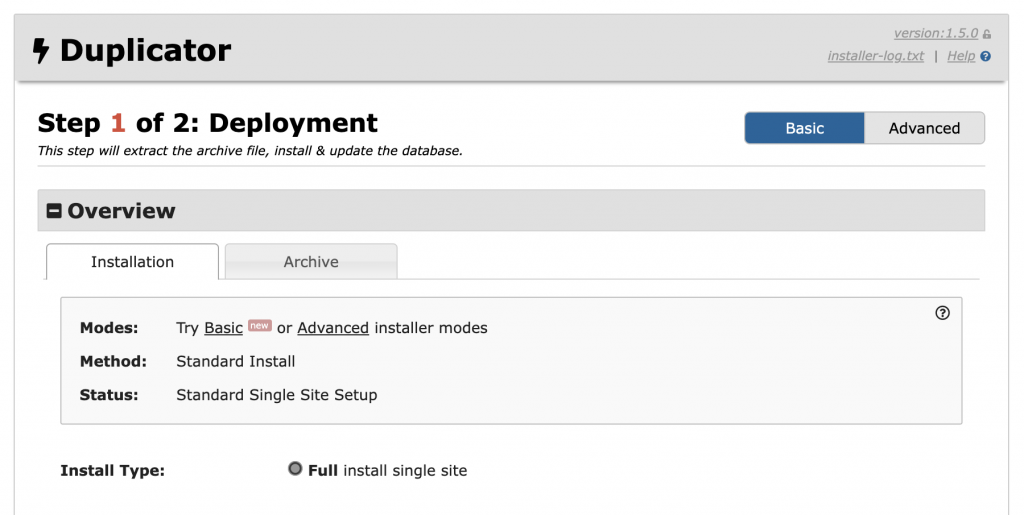
Once you search for this address, you’ll see the Duplicator installer pop up. At the top, you should see an overview of your cloned site.
Under Setup, enter your database information. This data includes your hostname, database name, username, and password.
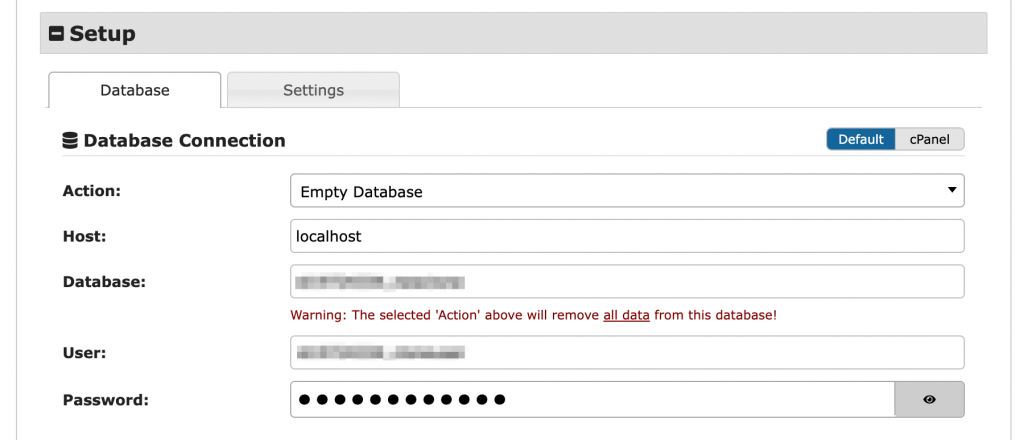
Before you can continue setting up your cloned site, Duplicator will need to evaluate its current setup. To start this process, hit Validate.
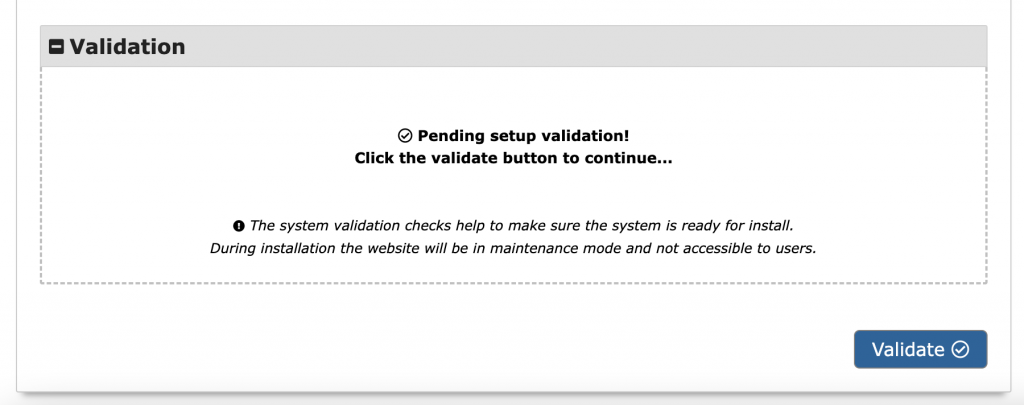
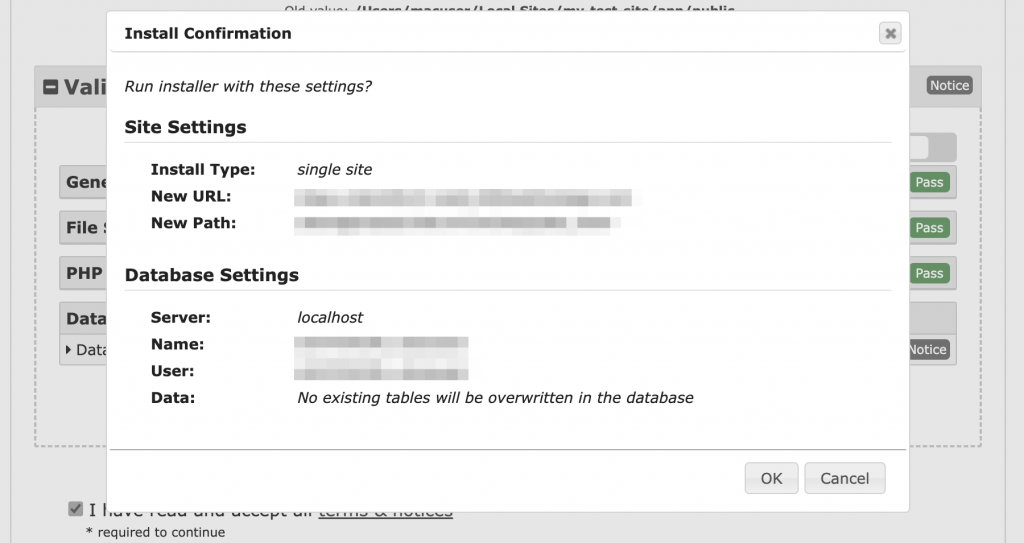
Once the scan is complete, you’ll see whether your cloning setup passed or failed. This can help you pinpoint errors before you continue. Accept the Terms and Conditions agreement if no issues were found and click on Next.
Finally, confirm that Duplicator can run the installation.
Once finished, Duplicator will give present a report regarding the installation process. You’ll be notified of any errors that occured.
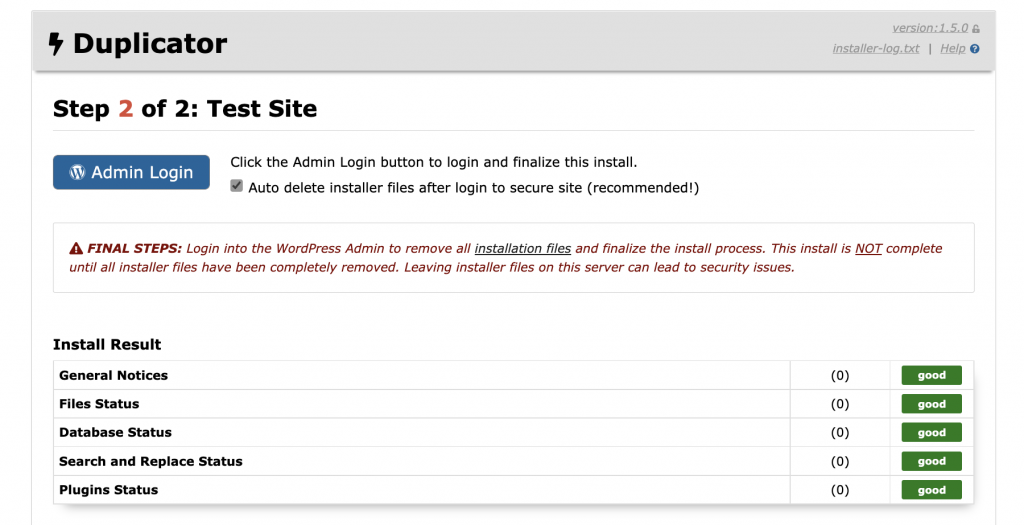
Then, you can use the Admin Login button to access your new WordPress dashboard! This will finalize the installation and enable you to start editing your cloned site.
3. Manually Clone Your Website
Consider cloning your site manually if you have more experience working with WordPress files and databases. This process will involve compressing the files, exporting the database, and then uploading both to the new location.
Step 1: Compress Your WordPress Files
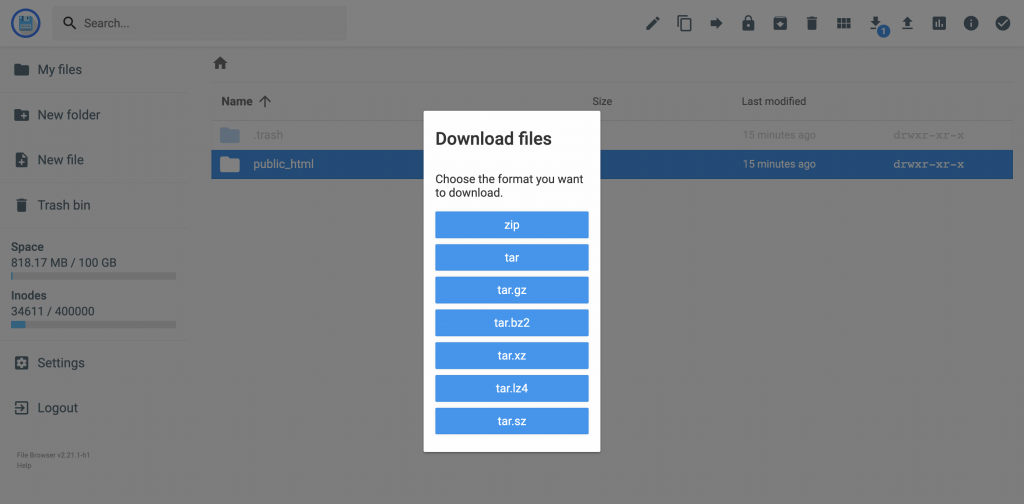
First, open your current WordPress installation in an FTP client or file manager. Locate the root directory and select the public_html folder.
Then, you’ll want to compress it into a ZIP file. To do this in the Hostinger file manager, click the Download button. In the pop-up window, select zip.
Once you do this, open the FTP or file manager for the new server location. You can then upload the compressed ZIP file to the public directory.
Alternatively, you can log in to your server via SSH and open the root directory. Then, download the compressed ZIP file. Be sure to update this command with your file’s specific URL:
wget URL_OF_ZIP_FILE
Finally, unzip the file using this command:
unzip FILE_NAME.zip
If you perform these tasks properly, all the copied files and folders will be extracted and placed in the new location!
Step 2: Migrate the Database
Next, you’ll need to export the original website’s database. Then, you’ll be able to import it into the new location.
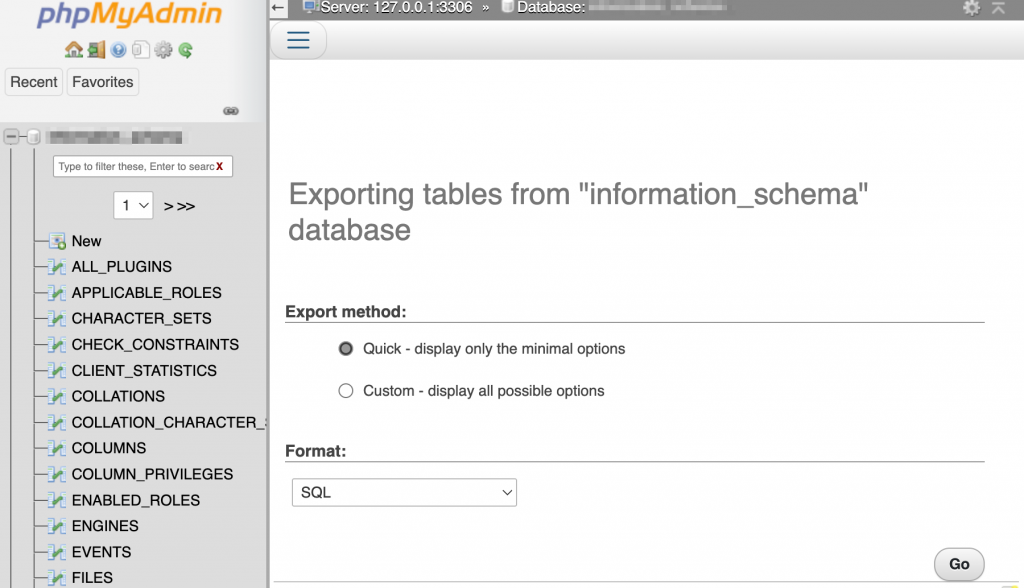
To begin, log in to a database manager like phpMyAdmin. Once you select the correct database, click on the Export button.
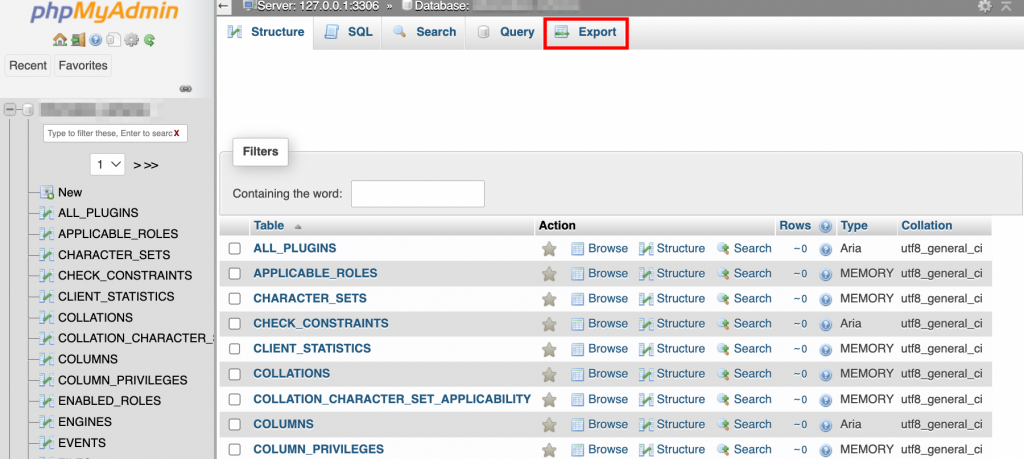
Then, be sure to select SQL for the Format. After you hit Go, the database will download as a SQL file.
Now log in to the database manager for the new website. Like the first method, click on the Database tab and create a new one.
Once you’ve created a new database, select Import. You can now upload your database file.
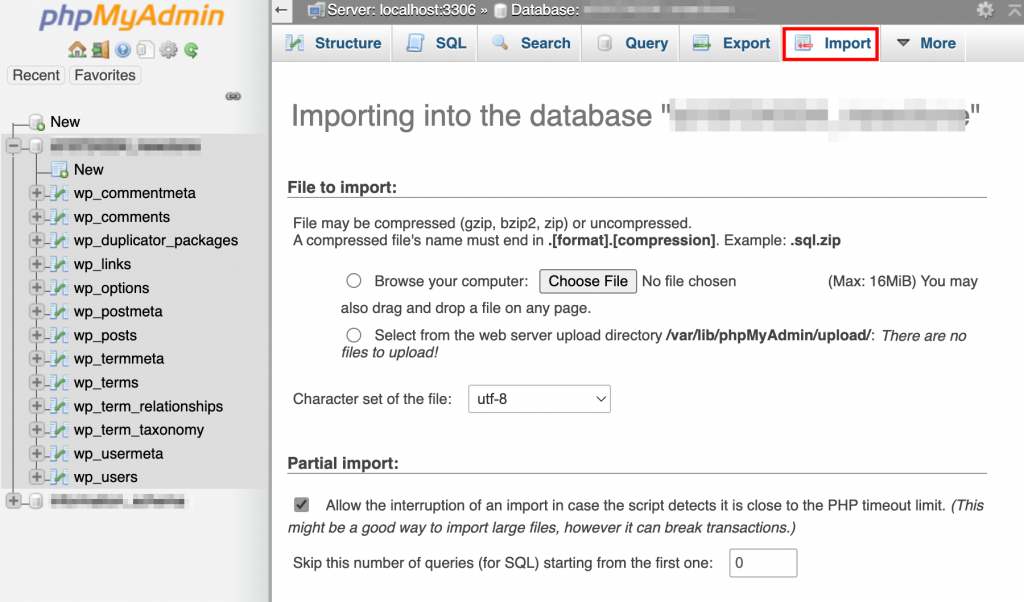
Be sure to select SQL as the format once again. After you hit Go, your original database will be uploaded to the cloned site.
Step 3: Update the wp-config.php File
Finally, open the site files for the newly cloned website. In your file manager or FTP client, find the wp-config.php file. You’ll need to make a few changes to this file to ensure that this new installation connects to the new database.
Once you find the wp-config.php file, open it. With Hostinger, you can edit this file without having to use a text editor.
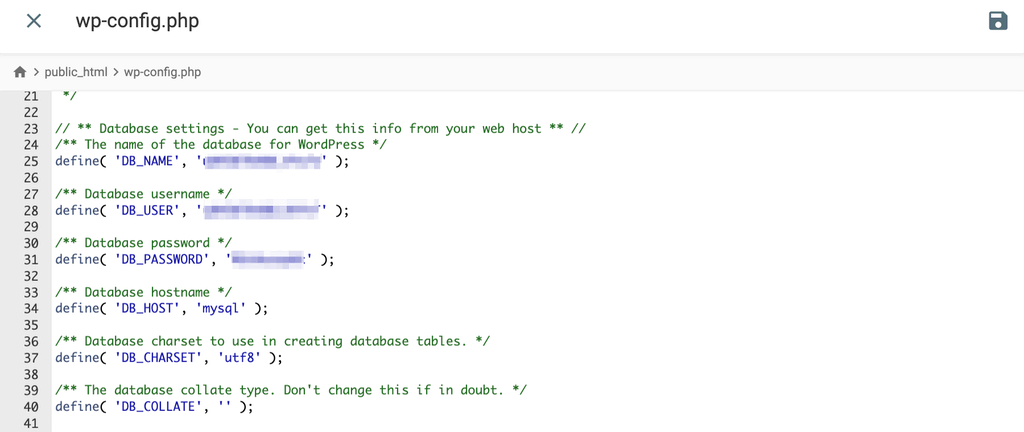
Now find your database information within the file. You’ll likely need to replace the name and password with the credentials for the new database:
Here’s the information you should update:
- DB_NAME – database name
- DB_USER – username for the database user
- DB_PASSWORD – database password
You’ll also need to make sure the DB_HOST value is correct. Since this will vary for different hosting platforms, you may need to contact your provider for accurate information.
Lastly, if you are duplicating the website to a different domain/subdomain, you will also need to add these two lines to match with the new domain name:
define( 'WP_HOME', 'https://newdomain.tld' );
define( 'WP_SITEURL', 'https://newdomain.tld' );
Once you’re finished with these changes, be sure to save the file. This will fully set up your new cloned website, which you can use for migrations, development, and more.
Conclusion
With a cloned version of your website, you can avoid the potential risks of migrating or developing your live site. Whether you’re a beginner or an advanced developer, you can easily duplicate your files and database.
To review, here are the three primary ways how you can clone a website:
- Use copy website feature of Hostinger.
- Install a cloning plugin such as Duplicator.
- Manually clone your website.
After using one of these methods, you’ll have a fully functional copy of your website, which you can use for safe development work and migration!
If you have any questions or suggestions, feel free to leave a comment below. Good luck!
